Virtual Desktops Using KVM (KVM-VDI)
KVM-VDI
This project aims to provide fully functional VDI solution by using open source virtualization.
Project supports two types of virtualization backend: plain QEMU-KVM and OpenStack (still in development).

KVM-VDI KVM backend
Aim of this module is to provide fully functional VDI solution by using QEMU-KVM hypervisor.
Module consists of three parts:
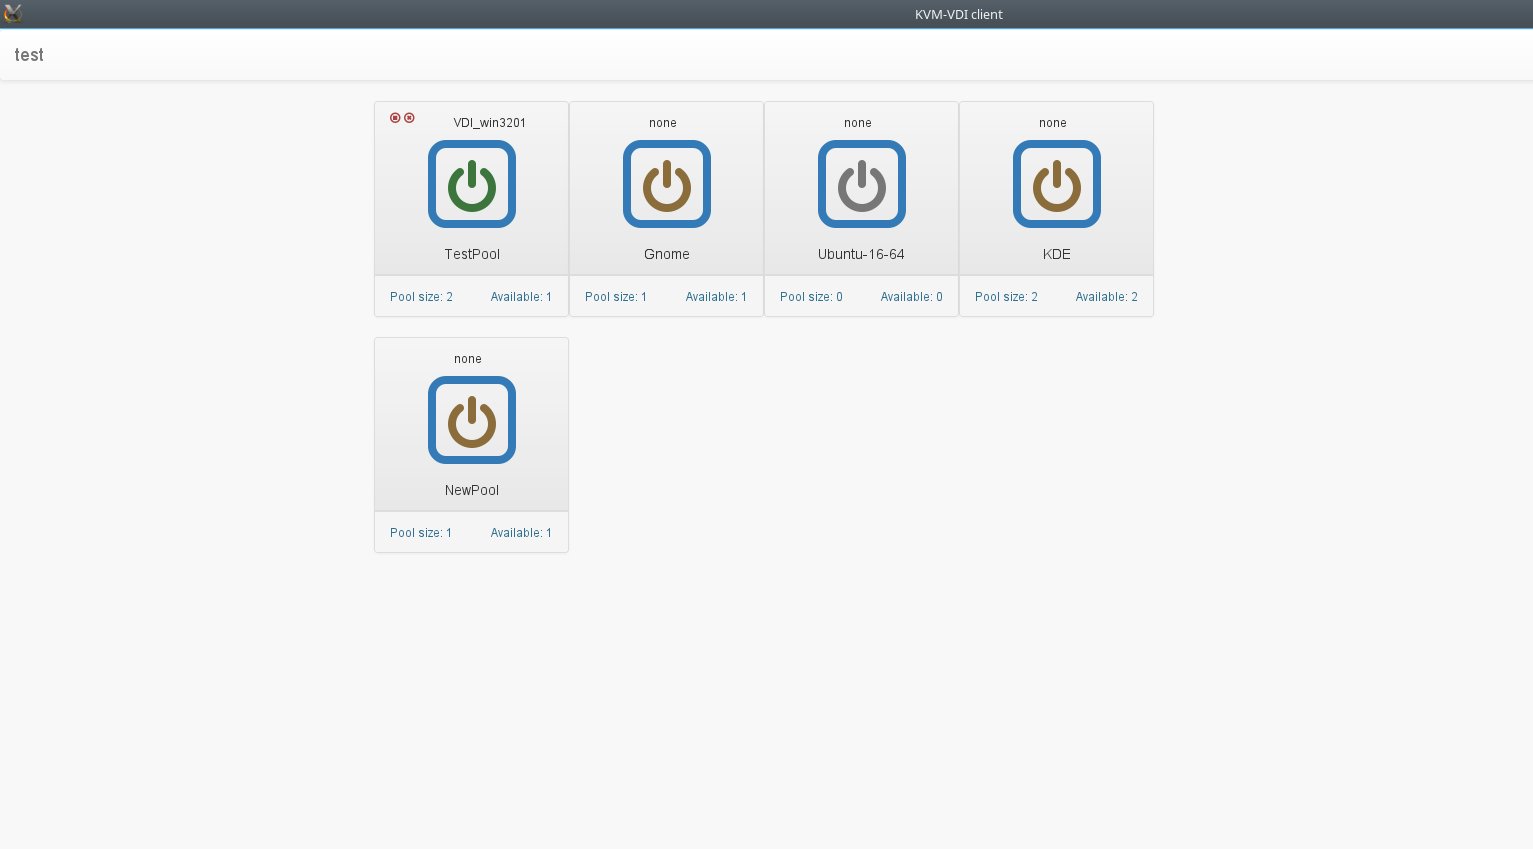
- Dashboard. A webservice, which provides virtual machine control.
- Thin client. A collection of scripts (thin_clients directory), which are run from thin client side (must be copied /usr/local/bin on thin client).
- Hypervisor. A collection of scripts (hypervisors directory) which are used at hypervisor side (must be copied to /usr/local/VDI on hypervisor).
Project uses qemu-kvm virtualization and provides VMs to thin client via SPICE protocol.
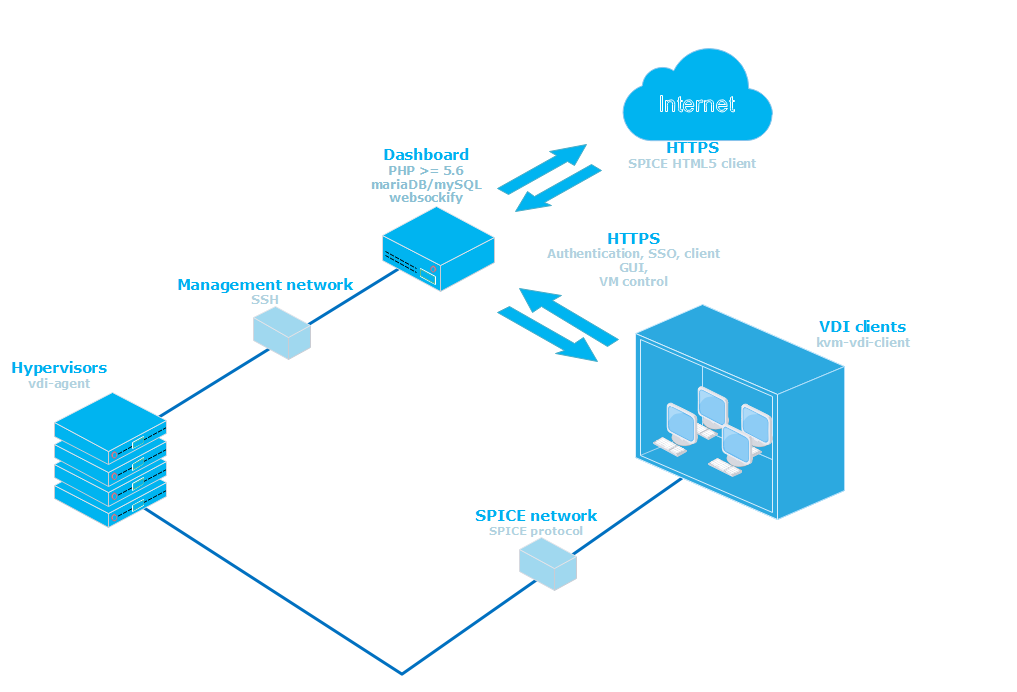
Basic architecture would look like this:
- Thin clients are booted from a network (or local storage for that matter). /usr/local/bin/vdi_init application should be run on system startup. I suggest using systemd for that. (systemd config file is provided in thin_clients directory).
- Hypervisors should have a user account with sudo nopasswd rights (see hypervisors/sudoers) file.
- Dashboard web service should be able to ssh to hypervisors via ‘username’ using RSA public/private keys.
Dashboard service (QEMU KVM)
Description
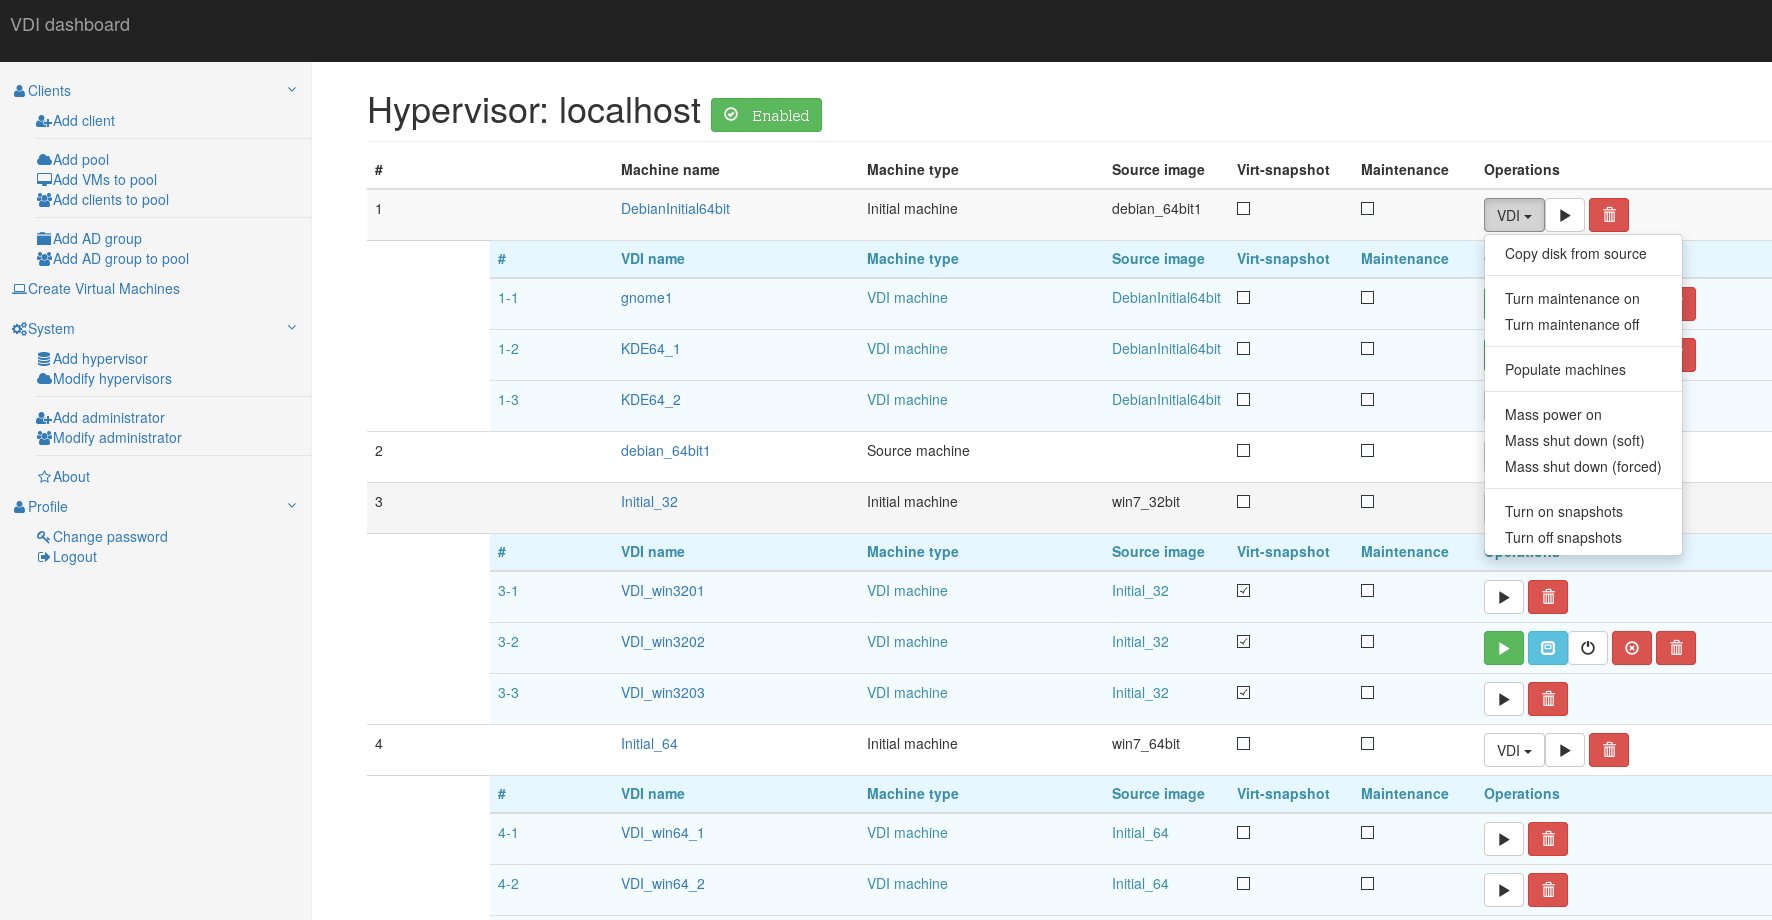
Dashboard service has four types of virtual machines:
- Simple machine – a standard VM, which is not connected with VDI service in any way.
- Source machine – a VM, which is used as source image – the “Initial machine” will be run from the copy of it’s drive image.
- Initial machine – a VM, which will provide a bootable source for VDI VMs.
- VDI – a virtual machine, which runs from “Initial machine’s” disk image. All changes are written to it’s snapshot drive, or virtual snapshot (if enabled).
- Virtual snapshot – if marked, VM will write disk changes to a temporary location (defined in hypervisor’s kvm-snap file). After machine is shut down (or rebooted, depending on its libvirt configuration), snapshot will be deleted.
- Maintenance – if marked, VM will not be provided to thin client.
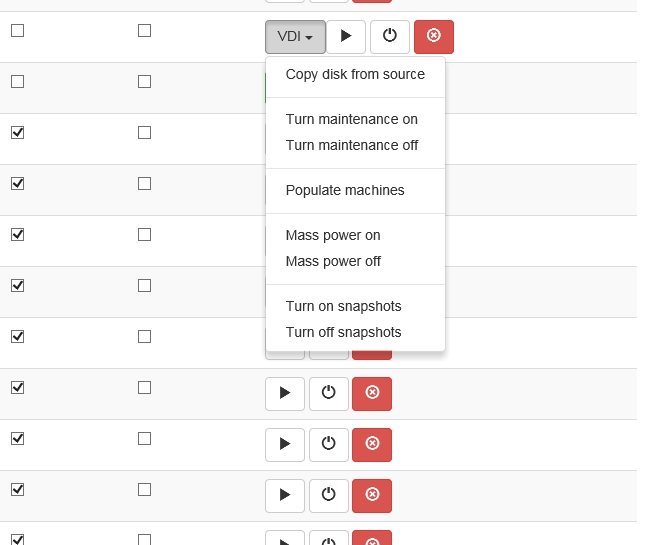
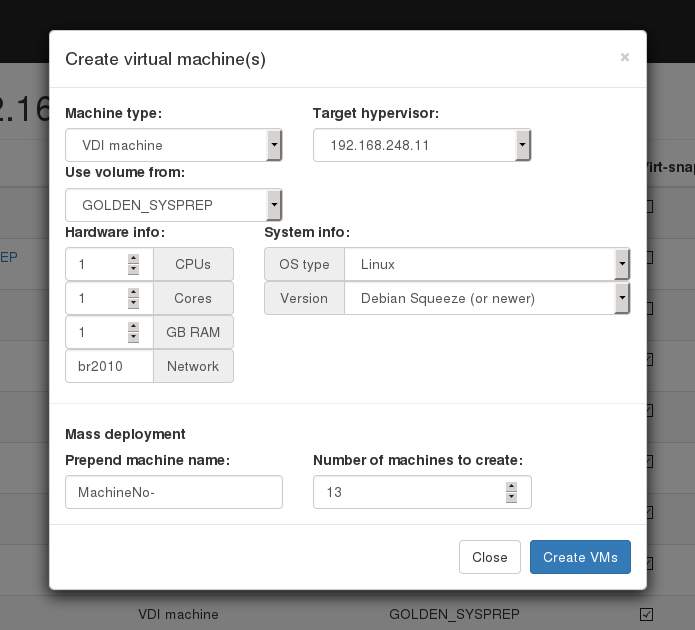
To provide a VDI enviroment you should take folowing steps: Create a “Source machine” and install a guest operating system to it. Create required number of VDI machines. Copy “Source machine’s” disk image to “Initial machine’s” disk image (“Copy disk from source” button). Create snapshots for all VDI VM’s from “Initial machine’s” disk image (“Populate machines” button);
Hypervisor installation
On Debian based systems:
KVM-VDI uses Python version 2. You may experience problems with Python version 3.
apt-get install qemu-kvm libvirt-bin sudo python python-requests virtinst socat libxml-xpath-perl
NOTICE: Ubuntu apparmor!
You must disable apparmor feature on hypervisors.
Failing to do so will disable “virtual snapshots” capabilities. And won’t allow VMs to start
service apparmor stop
update-rc.d -f apparmor remove
apt-get remove apparmor apparmor-utils
reboot
On dashboard servers and hypervisors create VDI user:
useradd -s /bin/bash -m VDI
On dashboard server type:
su VDI
cd
ssh-keygen -t rsa
copy files from /home/VDI/.ssh to /var/hyper_keys folder.
Make files in /var/hyper_keys readable by webserver.
copy rsa.pub file from dashboard /var/hyper_keys folder to each of hypervisors /home/VDI/.ssh/authorized_keys file. To check if everything works, from dashboard server type:
ssh -i /var/hyper_keys/id_rsa VDI@hypervisor_address
If passwordless connection is established, everythin is fine.
On each hypervisor create /usr/local/VDI folder. Copy all files from “hypervisors/” folder to /usr/local/VDI/ folder.
Edit config file accordingly. Note: password parameter in hypervisors/config file must match $backend_pass parameter in dashboard functions/config.php
Edit your /etc/sudoers file according to examlpe of hypervisors/sudeors file.
Copy systemd init script vdi-agent.service to your /etc/systemd/system.
Reload systemd: systemctl daemon-reload
Enable vdi-agent: systemctl enable vdi-agent
Start vdi-agent: systemctl start vdi-agent
Ensure that vdi-agent is running: systemctl status vdi-agent
Thin client installation
On Debian based systems:
apt-get install python python-requests virt-viewer python-qt4 python-webkit python-urllib3 python-gtk2
Copy files from thin_clients/ folder to your clients /usr/local/VDI-client/ folder.
Edit /usr/local/VDI-client/config file to fit your configuration.
run /usr/local/VDI-client/kvm-vdi-client
Guest OS installation
On Windows
Ensure, that you have installed spice-guest-tools from http://www.spice-space.org/download.html Afterwards, use this guide, to install oVirt related binaries: https://github.com/Seitanas/kvm-vdi/tree/master/guest_agent
Thin client installation
On Debian based systems:
apt-get install python python-requests virt-viewer python-qt4 python-webkit python-urllib3 python-gtk2
Copy files from thin_clients/ folder to your clients /usr/local/VDI-client/ folder.
Edit /usr/local/VDI-client/config file to fit your configuration.
run /usr/local/VDI-client/kvm-vdi-client
HTML5 SPICE client installation
KVM-VDI uses eyeOS HTML5 client to provide web-based access to virtual machines.
For this to work, you need to have websockify server running on dashboard server.
git clone https://github.com/kanaka/websockify
cd websockify
./run --token-plugin TokenFile --token-source /tmp/kvm-vdi 5959 --daemon
If dashboard is accessed from https, you need to add ssl certificates to websockify:
./run --token-plugin TokenFile --token-source /tmp/kvm-vdi 5959 --cert=CERTFILE --key=KEYFILE --daemon
You will have to edit spice_html5/run.js file:
https://github.com/Seitanas/kvm-vdi/blob/master/spice_html5/run.js#L215
Put ws if you are using HTTP or wss if you are using HTTPS.
Make sure, that there is no firewall rules blocking connections from websockify server to hypervisor ports 59xx.
Also, if certificates are self-signed, SPICE console will not be available on Mozilla Firefox browser.
You should create client login. Clients>add client. Then add client to atleast one VM pool (Add clients to pool).
If you are using AD/LDAP users, you must create at least one group for that user and add it to pool (Add AD group, Add AD group to pool).
After these steps you should get HTML5 console if you visit http://YOUR_DASHBOARD/kvm-vdi/client_index.php
If apache mod_rewrite is enabled, you can access HTML5 console via: http://YOUR_DASHBOARD/kvm-vdi/client
SOURCE: https://github.com/Seitanas/kvm-vdi/wiki
SOURCE: https://github.com/Seitanas/kvm-vdi