Installing Oracle Weblogic
What is Weblogic?
Oracle WebLogic Server is a Java EE 6 compatible application server that is part of Oracle Fusion Middleware suite of products. The WebLogic Server complete implementation of the Java EE 6 specification provides a standard set of APIs for creating distributed Java applications that can access a wide variety of services, such as databases, messaging services and connections to external Enterprise systems. End-user clients can access these applications using Web browser or standalone Java clients. It also supports the Spring Framework, a programming model for Java applications which delivers an alternative to many aspects of the Java EE model.
WebLogic Server provides the core application server runtime as part of the integrated OracleWebLogic Suite Java infrastructure. This integrated infrastructure enhances application performance, improves application availability and enables predictable and reliable application scalability with high quality of service.
WebLogic Suite contains the following server-side components:
- Oracle WebLogic Server: the core Java EE 6 application server which is discussed in this book.
- Oracle JRockit: this is a high performance JVM that optimizes performance of your Java applications on either the Windows or Linux operating system platforms with either 32-bit or 64-bit architectures. Oracle JRockit JVM is included with your WebLogic Server installation.
- Oracle Coherence: Oracle Coherence is a component of Oracle Fusion Middleware that enables organizations to predictably scale mission-critical applications by providing fast and reliable access to frequently used data. By automatically and dynamically partitioning data in memory across multiple servers, Oracle Coherence enables continuous data availability and transactional integrity, even in the event of a server failure.
- Oracle TopLink: is an advanced, object-persistence and object-transformation framework that provides development tools and run time capabilities that reduce development and maintenance efforts while increasing Enterprise application functionality.
Installing Oracle Weblogic
Oracle Weblogic products are available at: http://www.oracle.com/technetwork/middleware/fusion-middleware/downloads/index.html
From the download area, you can access to the Oracle Fusion Middleware software.
These distributions are intended to use for development only. If you are a licensed customer you can obtain Oracle Weblogic server at Oracle Software Delivery cloud at (https://edelivery.oracle.com/).
As you can see from the Oracle network site, there are basically three types of distributions of Oracle WLS:
- Full Installer 32 bit: this distribution is platform specific and includes Oracle WLS, Oracle Coherence and Oracle Enterprise Pack for Eclipse. It is meant for installation with a 32bit JVM only.
- Generic: this distribution is platform independent and can be used to install Oracle WLS on any supported 32bit or 64bit platform. It ships as a generic archive and includes Oracle WLS and Oracle Coherence.
- Zip distribution: this distribution is also platform independent and contains barely Oracle WLS to be extracted from a compressed archive.
And here’s a snapshot from Oracle portal where you are going to download Oracle WLS:

You need at first to accept the license agreement in order to proceed. Next, you will be prompted to enter Oracle Single Sign-on user name and password (former registration required). Once done with login, download will start.
Installing Oracle WLS using the Platform Installer
The simplest way to install the whole platform bundle is the Full Installer which can be carried out with a simple and intuitive wizard. Once downloaded the installer execute (Windows):
|
1
|
oepe-12.1.2.1-kepler-installer-win32.exe |
On Linux:
|
1
2
|
chmod a+x oepe-12.1.2.1-kepler-installer-linux-gtk.bin./oepe-12.1.2.1-kepler-installer-linux-gtk.bin |
The install wizard will start and you will be asked to complete the following steps:
1. Choose Middleware Home Directory
You need at first to specify the Middleware Home directory that will serve as the central support directory for all Fusion Middleware products installed on the target system, including WebLogic Server.
If you already have a Middleware Home directory on your system, it is recommended that you select the “Use an existing Middleware Home” and then browse that directory. Otherwise, simply select the “Create a new Middleware Home”and enter its name as shown by the following picture:
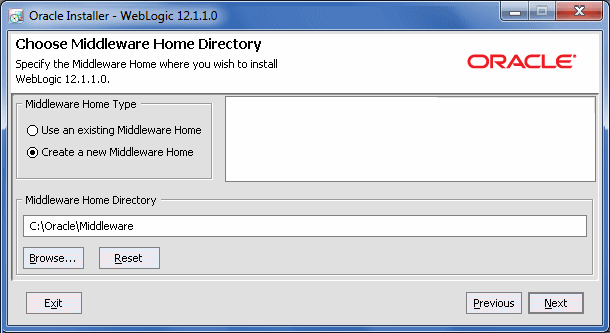
Click Next to continue.
2. Register for Security Updates
Specify whether you want to register the product installation with My Oracle Support. By registering, Oracle Support notifies you immediately of any security updates that are specific to your installation.

Click Next to continue.
3. Installing Oracle WLS
Now the server installation will start. There are two types of installation you can perform:
- Typical: All the software components included in your distribution are installed on your system. Typical installation does not include the Server Examples.
- Custom: You select the software components to be installed. On Windows systems, you also have the option to install Oracle WebLogic Server Node Manager as a Windows service. If you want to install the Server Examples, you must select this option.
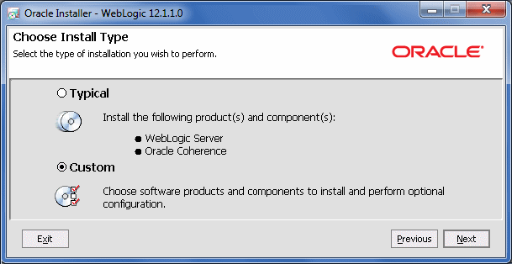
Click Next to continue.
4. Choose products and Components
This screen displays a tree view of all the components available for installation. Specify the components to be installed by selecting or clearing the appropriate check boxes.

The suggested product installation requires that you install at least the Core Application Server, the Administration Console and Weblogic JDBC Drivers. Click Next to continue.
5. JDK Selection
This screen displays a list of JDKs. Select the JDK that you want to install with the product.You can also browse and select a local JDK (at least 1.6.0_05) installed on your machine.

Click Next to continue.
6. Choose product installation directories
Specify the directories in which you want to install the products (WebLogic Server and Coherence, if applicable).
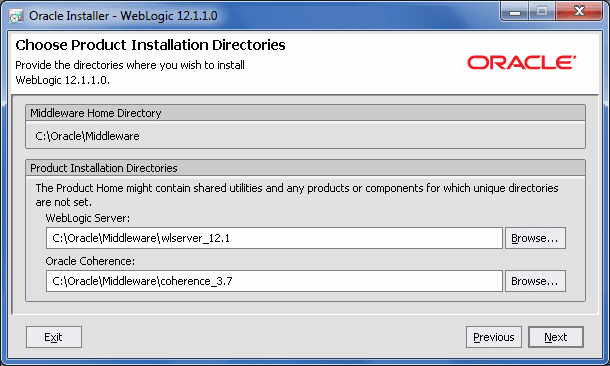
Click Next to continue and confirm your product installation directories in the next screen.
7. Install WLS as Service
Choose whether you want to install Oracle WLS as service. For example, if you are running the Installer on Windows, in this screen you will be able to configure the WLS Node Manager service as System boot service. The Node Manager is used to monitor, start and stop server instances in a WebLogic domain. If you choose to defer the installation of the Node Manager as a service, you will need to install it manually (See Chapter 2 “Starting the Node Manager” for more info about it).
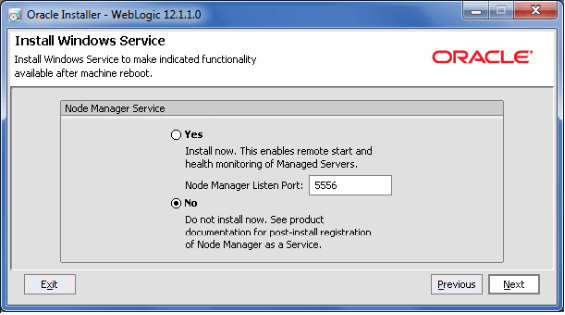
Click Next to continue.
8. Choose Shortcut Location
Specify the Start menu folder in which you want the Start menu shortcuts to be created

When the installation program has finished copying the specified files to your system, click Next to continue. Once completed, you can move to the next step, that is creating a new WLS domain and start the application server (See recipe “Creating a Weblogic Domain” contained in this chapter).
Running the Installer Program in Console Mode
If you got as little as a terminal you can still execute the Platform Installer in Console Mode. To start the installation program in Console Mode, open a terminal window and go to the directory that contains the installation program.
Launch the installation by entering the name of the installation program passing -mode=console. For example, to start the WebLogic Server Package installer for Windows in console mode, enter:
|
1
|
oepe-12.1.2.1-kepler-installer-win32.exe -mode=console |
On Linux:
|
1
2
|
chmod a+x oepe-12.1.2.1-kepler-installer-linux-gtk.bin./oepe-12.1.2.1-kepler-installer-linux-gtk.bin -mode=console |
Where file_name.bin is the name of your installation program.
SOURCE: http://www.itbuzzpress.com/weblogic-tutorials/installing-oracle-weblogic/installing-oracle-weblogic.html
Installing Oracle Weblogic using the Generic Installer
Installing the Generic Installer distribution
The generic installer distribution can be used to install Oracle WLS on any supported 32 or 64 bit platform. The installation process is essentially the same as the full installer but you need to be aware of a few things before getting started:
- This distribution does not include a JDK therefore it’s your duty to check that you have a correctly installed JDK. You should set as well the JAVA_HOME pointing to the folder where Java is installed and update the System PATH accordingly.
- This distribution can be installed by using a terminal Window.
Here’s how to proceed with the installation:
Linux users:
|
1
2
3
|
$ export JAVA_HOME=/home/myhome/myjavahome$ export PATH=$JAVA_HOME/bin:$PATH |
Windows users:
|
1
2
3
|
set JAVA_HOME=yourJavaInstallPath set PATH=%JAVA_HOME%/bin;%PATH% |
Now you can move on with the installation by executing:
|
1
|
java –jar wls_121200.jar |
Once uncompressed the archive, you can follow the same steps depicted in the Full Installer distribution.
SOURCE: http://www.itbuzzpress.com/weblogic-tutorials/installing-oracle-weblogic/installing-oracle-weblogic-using-the-generic-installer.html
Installing Oracle Weblogic using the ZIP distribution
Installing Oracle WLS using the zip distribution is not carried out using an Installer Wizard; however, if you have no prejudices about using operating system’s shells, this installation can be a real time saver (and disk space saver as well!). As a matter of fact, this distribution is supported on Windows, Linux and Mac OS X systems and contains the necessary artifacts required to setup a basic installation of Oracle WebLogic Server.
| An optional supplemental zip (wls1212_dev_supplemental.zip) is available as a separate download. The supplemental zip contains samples, evaluation database (Derby) and L10N console help files. |
Here are the steps to perform installation of the Zip distribution:
1. Unzip the file
Extract the contents of the zip to a directory. This directory is referred to as MW_HOME (eg: /home/myhome/mywls).
2. Setup OS variables
Setup JAVA_HOME, MW_HOME and JAVA_VENDOR (Windows users only) variables in the current shell as required for the target platform.
Linux:
|
1
2
3
|
$ export JAVA_HOME=/home/myhome/myjavahome$ export MW_HOME=/home/myhome/mywls |
Windows:
|
1
2
3
4
5
|
set JAVA_HOME=C:\home\myhome\myjavahomeset MW_HOME=C:\home\myhome\mywlsset JAVA_VENDOR=[Sun|Oracle] |
3. Run the installation script
Launch the installation configuration script in the MW_HOME. This step is required to be run only once. If you move the installation to another location/machine, you need to rerun this step. On a Linux machine execute:
|
1
|
$ . ./configure.sh |
On a Windows platform execute instead:
|
1
|
configure.cmd |
Now the configure command will start unpacking the archived distribution as you can see from the following snapshot:

It might take a while to complete but then you are done with the application server installation.
4. Set the WLS environment variables
Now execute the setWLSEnv script which is located in the bin folder of your server distribution. This will set a proper environment configuration for executing Oracle WLS shell commands:
Linux
|
1
|
$ . $MW_HOME/wlserver/server/bin/setWLSEnv.sh |
Windows
|
1
|
%MW_HOME%\wlserver\server\bin\setWLSEnv.cmd |
Once completed, you can move to the next step, that is creating a new WLS domain and start WLS.
SOURCE: http://www.itbuzzpress.com/weblogic-tutorials/installing-oracle-weblogic/installing-oracle-weblogic-using-the-zip-distribution.html
Configuring WebLogic
http://www.itbuzzpress.com/weblogic-tutorials/configuring-oracle-weblogic.html
WebLogic Database Connectivity
http://www.itbuzzpress.com/weblogic-tutorials/database-connectivity.html
WebLogic Logging Configuration
http://www.itbuzzpress.com/weblogic-tutorials/oracle-weblogic-logging-configuration.html